
Display Images With a Flashlight or Lamp
Do you need to project an image on the wall, but don’t have a projector to do it and are concerned about which is the best projectors for the living room? Not to worry! This DIY guide will take you step-by-step through the process of projecting an image on the wall with just a few supplies. We’ll help you transform any wall into a projector screen anytime, anywhere – and all you need to make it happen is a few simple items that you likely already have around the house!
Whether you want to create a movie theater setup, a custom art projection, or a special photo montage, we’ll show you how to project an image on the wall in no time. Let’s get started!
Quick Explanation of Key Points
You can use a mirror reflecting direct sunlight or an overhead light source to project the image onto your wall. Alternatively, you can create and print out a reverse-image of the picture you wish to project and hold it up against the wall with a light source behind it.
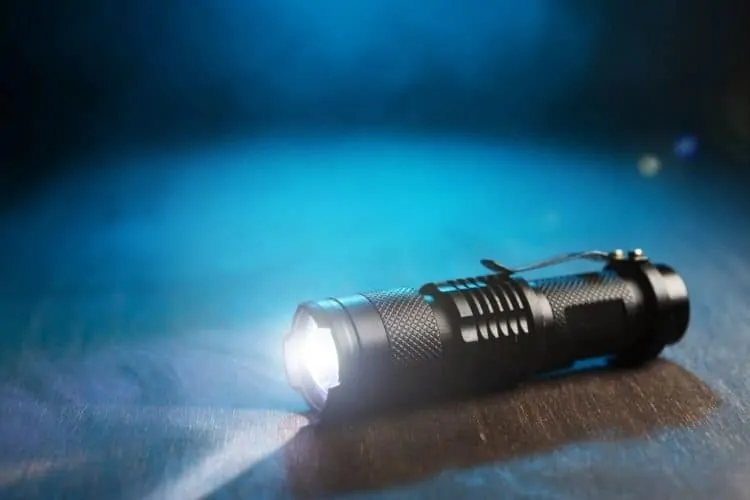
Projecting a picture or image onto a wall without the use of a physical projector is entirely possible. One easy way to do this is to solely use a flashlight or lamp in order to illuminate and display an image.Begin by prepping your lamp or flashlight for the job at hand, since you’ll need to orient it so that the beam will travel to the surface you’re projecting onto.
Remove any shade or filter that may be around the bulb, and make sure that the beam is shining directly at your wall. Additionally, make sure to keep your lamp stationary, as even the slightest jolt can cause your projected image to become distorted.Once you have successfully prepped your light source, take whatever images you are wishing to display and secure them on the wall. If they are printed off, adhere them with tape or sticky tack.
Otherwise, if they’re digital images stored on your computer or phone, aim your flashlight at the screen and point it towards the wall. The reflection should then appear on your desired surface.This simple method of displaying images has its advantages. It does not require extra hardware such as projectors and its affordability makes it an ideal choice for those looking for cheaper solutions for home entertainment purposes or creating makeshift art installations.
However, one potential drawback of using just a flashlight or lamp is that these fixtures don’t provide HD resolution due to their lower wattage compared to projectors and other devices specifically designed for such uses.
Moving from here, the next step in our DIY guide will focus on how one can go about reflecting a projected image off of something else in order to further bolster image quality – let’s begin by exploring what it means to reflect an image with a flashlight in more detail: “Flashlight Reflection”.
Essential Points to Remember
Projecting images without a physical projector is possible by using a flashlight or lamp. By removing any filters from the bulb and keeping it stationary, one can securely attach prepped images to a wall or shine them from an electronic device onto a wall for display. This inexpensive method has advantages including affordability, though the resolution won’t be HD compared to projectors. The next step in the DIY guide focuses on reflecting images with a flashlight for better quality.
Flashlight Reflection
When it comes to a cost-effective and efficient way for projecting an image onto a wall without a projector, the focus light reflection method can easily do the job. This approach is relatively simple to do but requires some specialized materials.First, you’ll need to obtain a flat white surface that will be used as the projection surface.
You can use any material you have on hand such as poster boards, foam core boards, or even poster paper. Having this blank canvas can make the process easier as you won’t have to worry about obstructions blocking your view.Once your projection surface has been obtained, you’ll need to provide illumination with a flashlight.

Position the beam of light across the back walls and attach your projection surface so that it stands in front of this illuminated area. This can be done by simply taping the board so that it’s standing upright against the wall. Once this is accomplished, you should find that light falling on the board is reflected off creating an image on the projection surface.
Now, if you’re looking for something more complex than a still image, you may want to play around with the focus of your flashlight beam creating various shapes and sizes on your canvas from abstract art to natural silhouettes creating a unique experience.Although flashlight reflection is an easy and effective way to project an image onto a wall without having to invest in costly equipment, it does come with its limitations as far as quality and consistency go.
It may be necessary for you to constantly adjust or reposition both your flashlight and projection surfaces due to constant changes in lighting or shift in angles in order to produce clear images which certainly adds time and hassle into your set up process.
As such, flashlight reflection can be seen as both economical yet limited making it not always ideal when trying to project detailed images or maintain stability over long periods of time. The next section will explain how an alternative approach known as lamp projection could be used instead for a more reliable solution.

- According to research, using a simple magnifying glass can help increase the size of small images up to 10 times their original size.
- Additionally, one of the traditional methods of projection uses a mirror and sunlight, which involves focusing sunlight onto a reflective surface before you turn it onto a white screen or wall.
- A study conducted in 2020 found that smartphones and tablets are now commonly used as an alternative and convenient way to project images onto walls, thanks to their improved image resolutions, increased brightness settings and integrated cameras.
Lamp Projection

Lamp Projection is a creative and relatively straightforward way to project an image onto a wall without the use of a projector. The process involves projecting the image onto a flat surface, such as a white sheet or wall, with the help of a light source like a lamp. It is important to choose a lamp with a bright light bulb and the higher the wattage, the better.
If you do not have access to an adjustable light source, make sure to use something powerful and diffuse enough, such as a halogen lamp or standing floor lamp that can be raised up for optimal projection distance.Once you have your lamp source selected and ready, adjust it to its brightest setting and hang up your projection material in a location that allows for ample room between the screen and the projector itself.
Place yourself at least two feet away from the background material, so that there is ample space between you and the projected image. Adjusting the distance between the projector and background material may require some trial-and-error experimentation before achieving your desired results. It is important to note that due to the variation in brightness among lamps of different makes and models, some images may not appear as sharp as those cast on front-projection units.
Many DIYers believe that by using this method they are able to save money in having to purchase a dedicated projector, however it should also be noted that ordinary lamp bulbs tend to wear down quickly when regularly used in high-luminance applications, prompting replacements more frequently than when used with traditional projectors.
Given these considerations, some may opt to go with a projector regardless of its expense. Ultimately, it depends on individual preference considering both convenience and budget viability factors. With this in mind, the next section will explore Display Images With Natural Light which could provide other cost effective options for viewers in search of an alternative projection approach.
Display Images With Natural Light
![]()
Projecting images and pictures onto a wall without the use of a projector can be quite a challenging task and may seem like an impossibility if you have no access to other necessary tools or technology. However, it is possible to utilize natural light for this purpose if you have a steady and plentiful source of it.Using natural light will require a few supplies and adequate preparation time to ensure the projection is successful.
Acquiring transparent photographs or slides, even movies, is the first step in this process. Once these items are collected, they must be securely taped with either masking tape or clear scotch tape to a window that faces the wall you want your image to appear on. You’ll need to keep in mind where the sunlight will fall across the window pane and make sure it won’t move or be blocked for an extended period of time during your projection process.
When using natural light, take into account that temperature affects transparency so it’s important to consider what type of material (wood, glass, plexiglass) was used as your base to hang or tape your images or slides on. In addition, consider the amount of exposure time needed depending on how transparent each individual piece may be when cast under direct sunlight.
You might need to experiment with various kinds of slide materials or plays with the angle of which the projections appears in order for the image quality to become more visible against a particular surface such as a wall or ceiling. It is important to note that working with natural light can yield some impressive results as long as everything is set up properly.
To gain full control over your projected images, however, having access to a standard projector would certainly make all difference needed regarding brightness and resolution quality. Using the sun’s light is an innovative DIY solution when working through projection problems but could involve some trial and error along the way due its variable nature – making it difficult to determine exactly what variables need to be adjusted in order for desired outcomes to occur smoothly.
In the next section we will cover important steps and tips related specifically on how best to use available natural sunlight sources for successful projections without compromising on quality or imagery.
Using the Sun’s Light

Using the Sun’s Light is a simple, cost-effective way to project an image onto a wall without a projector. To begin, find a sunny day and place your laptop or other device with a graphical image on the ground outside. Position it so the image is reflected from the walls of a nearby building onto the white surface you’ve mounted to your wall.
For added security, weight down the computer with heavy books or stones in case there is any wind.The greatest advantage of using the Sun’s light to project images is that it is free and available nearly everywhere on most days. Additionally, many people have access to outdoor spaces where they can use this technique easily. However, there are some potential disadvantages associated with this method as well.
It can be difficult to achieve focus due to changing sunlight over time, and reflections off nearby buildings may appear distorted if placed too close. Weather conditions such as cloudy skies or strong winds could also interfere with obtaining a clear reflection.
Nevertheless, this DIY hack is beneficial for those seeking to project an image without a projector in situations where traditional methods would be expensive or impractical. With some clever positioning and a bit of attention, one can create high-quality images using only the power of sunlight! The next step in our easy DIY guide is setting up a sunlight lens to further improve picture quality and clarity.
Sunlight Lens

Sunlight Lens is one of the easiest and most cost effective ways to project an image on a wall if you do not have access to a projector. By amplifying sunlight and pushing it through a simple lens system, you can sharpen and enlarge the projection, creating a clearer and brighter display of the projected image. One of the simplest methods involves using water, a magnifying glass, or simply holding up transparent material to refract natural light.
While this method of projection requires minimal effort and resources, there are some drawbacks that come with utilizing sunlight lens. Its biggest disadvantage is that you need an adequate source of direct sunlight to project the image in order to make it viewable. If the weather is cloudy or inclement, then it may be difficult for you to get a clear picture on your wall.
Additionally, the picture will only last during daylight hours until the sun sets, meaning that this method of projection cannot be used for longer presentations or multi-day events. However, despite these difficulties, Sunlight Lens can be an easy and efficient way to project images without access to a dedicated projector at a low cost.
Whether you’re looking for a quick solution for a presentation or simply want to add some charm to your garden party with movie screenings after dark, any DIYer should consider the convenience and affordability of Sunlens projection before investing in more complex piece equipment. With that in mind, the next step in our guide is understanding how to make your own homemade projector.
Making a Homemade Projector

Making a Homemade Projector is an affordable and creative way to project images onto a wall without the need for a traditional projector. This DIY approach requires minimal equipment, such as a magnifying glass, light bulb or other bright light source in place of the projector’s lamp and reflecting surface. A flat surface such as cardboard or poster board can be used to provide a sharp focus point for the projected image.
Whether creating a homemade projector is an effective alternative to purchasing a traditional projector is up for debate. Those who support this DIY approach argue that it provides an affordable solution for those looking to project images onto walls without having to break the bank.
However, detractors assert that this method can produce poor quality projections due to the difficulty in constructing and calibrating the homemade projector correctly. That being said, those who have taken the time to construct their own homemade projector have seen surprisingly good results, so if you’re looking for a relatively easy alternative to using an expensive professional-grade projector this could be worth considering.
Now that we’ve explored making a homemade projector let’s move on to our next section and take a look at some other creative ways you can project an image without the use of a regular projector.
Other Creative Ways to Project an Image

The fun of projecting images onto a wall can be extended in many creative ways, but it requires some additional materials that may not always be available. Projecting with light boxes that draw large-scale patterns on the walls is an intriguing way to add more personality to otherwise plain walls. To do this, you will need the right type of light box, which are typically made of translucent acrylic or rigid cardboard.
To create the correct shape, use stencils and scissors. Make sure you have a strong light source like a light bulb, lamp or even a lantern to cast vivid shadows on the wall. You can customize your projection by changing its transparency or size, depending on your desired effect. For something more artistic and visually appealing, you could try projecting onto fabric.
It is easy to construct a DIY projector with just simple everyday items like transparencies, tape and yarn or string accessed from around your home. This quirky projector is great for displaying photos and other animated designs. You could even hang it up as a unique piece of art!Of course, if you want to take the tech-savvy route, digital devices such as mobile phones with projection capabilities can also be used to project larger-than-life images.
This is becoming increasingly popular as more cutting edge technology continues to emerge on the market. With modern technology at your fingertips and powerful projections around every corner, finding creative ways to share your message has never been easier. Debates aside as to which medium is better suited for projecting images on a wall – whether it’s light boxes, DIY contraptions or digital devices – any one of these options can help bring out your inner artist.
The only limit is your imagination! Leading into the next section: While traditional projectors are a great tool for projecting images onto walls and screens, there are other ways to experiment with creating visual works of art using objects around the house in order to magnify images and create captivating displays. Stay tuned for our next section about “Magnifying Objects” for this unique DIY experience!
Magnifying Objects

Using magnifying objects to project an image onto a wall is a classic technique that has been used for centuries. This can be done by holding up a glass or other transparent structure up to the surface alongside the light source and your desired image. By doing this, the light from the source will pass through the glass and project an enlarged version of your chosen image on to the wall.
However, this traditional method of projection can come with its drawbacks. The most significant challenge is ensuring that you have access to a transparent object of the appropriate size which does not distort or blur your image when projected onto the wall. In addition, it requires quite precise adjustments in order to get a clear image, and this tedious process can be difficult, especially when using smaller objects such as jewels or lenses.
Ultimately, magnifying objects offer an effective and simple way of projecting images without having to purchase expensive equipment like projectors. It can be a reliable solution if done correctly; however it may involve some trial and error before being able to achieve a clear result. Now that we’ve discussed magnifying objects as one method of projection, let’s focus on another traditional solution – using candlelight.
Using Candle Light

Using candle light is a unique and creative way to project images on a wall without a projector. The flame from the candle will be used to cast shadows of your chosen image or text onto a wall or surface, creating an interesting and eye-catching overview of your intended picture or written message. On the one hand, this method is complicated and very difficult to make the images look clear.
You need to create the right kind of image at a certain angle that can successfully be projected by the candle’s light. On the other hand, it is both cheap and easy to assemble; all you need is a well-lit room, some candles, and most importantly, your pictures or designs as templates.
The key step when using candle light to project images onto a wall is to get your preferred angle correct – too far away and you won’t be able to make out your image. Too close and the smoke from the candle may distort the projection. To ensure sharp contrasts, it is recommended that you use white backgrounds for your images and place them over cardboard with dark colors for maximum visual impact.
With patience and practice, anyone can master this simple yet efficient DIY technique for projecting images without using a projector. In the next section we’ll discuss how you can use this technique to project snapshots and photographs.
Projecting Snapshots and Photographs
Projecting a snapshot or photograph almost always results in a poor quality image. The reason for this is because a photo is a still image, and you are attempting to project it on a wall with minimal pigment resolution. This can result in the photograph becoming heavily pixelated, or losing some detail.
When deciding whether to project a photograph with weak results or opt out of the idea altogether, there are pros and cons to consider. On one hand, if you are looking to quickly display a photograph or snapshot, projecting it onto the wall may be your only option.
On the other hand, creating a digital copy of the image and displaying it on an electronic device such as a tablet or computer with good picture quality and clarity might be more suitable. Whether you choose to directly project the photograph or display an improved digital version that’s projected is up to you.
However, it is important to remember that both options will have their respective limitations when it comes to viewing quality and detail. Final Thoughts and Alternatives: With this in mind, let’s take a look at some potential final thoughts and alternatives when it comes to projecting images on a wall without using a projector.
Final Thoughts and Alternatives

Projecting an image onto a wall is an easy (albeit potentially complicated) do-it-yourself project. Though the use of ordinary household items such as magnifying glasses, mirrors, and cardboard can help you easily project images without the need for special equipment or technology, there are some drawbacks to consider.
By using these common items, most of your projected images will be in lower resolution and have much less clarity than if using an actual projector. Additionally, while it may be possible to get the idea across, many DIY methods require multiple attempts at getting the right angle and other factors that can make what’s seemingly a simple task much more challenging.
Depending on your needs, there are some alternatives that may be preferable or even necessary to achieve the desired result with greater ease or efficiency. If you’re needing to present a corporate presentation to potential business partners or give a TEDx talk in front of hundreds of people, having professional quality projection technology is likely going to be a must.
Also, if you need large scale projections that are more dynamic and intricate than what DIY projects can provide, it may be necessary to seek out alternative solutions like 3D projection mapping services or digital projectors using dedicated media players. Of course, this does not mean that DIY image projection is not without its own virtues.
Many times, DIY projects can be seen as an elegant solution for those with limited budgets or who are simply looking for convenience due to lack of access to more advanced technology—the ultimate goal being achieving the desired effect in spite of these challenges.
Furthermore, depending on your situation and needs, there are plenty of both good and bad reasons for choosing one method over another; what works best for one person may not necessarily work equally well for someone else in a similar situation.
With all of this in mind, considering both the advantages and disadvantages of each method before making a decision is essential when trying to decide which approach is best suited for your individual needs and wants.
Frequently Asked Questions and Explanations

Are there any creative ways to project an image onto a wall without a projector?
Yes, there are creative ways to project an image onto a wall without a projector! One of the most common methods is to use a small handheld mirror and direct sunlight onto the wall. This is often used at festivals or events and can create a bright and vibrant projection. Additionally, if you have access to a traditional overhead projector, you can simply place your image on top of the projector’s light source and point it towards the wall. This method is not as bright or defined but still yields satisfying results. Finally, some modern smartphones come with built-in projectors that allow you to accurately project any image directly from the phone onto a wall—just make sure to keep the room dark for maximum effect.
What materials or tools do I need to project an image onto a wall without a projector?
In order to project an image onto a wall without a projector, you will need the following items:- A white wall or surface (or a white sheet if possible)- A light source such as a flashlight, desk lamp, cell phone light, or natural daylight- An opaque object with a shape that is similar to the image you want to project- A transparent screen such as a transparency paper or plastic sheet.
With these materials it is quite easy to project an image on any white wall. Begin by placing your opaque object in front of the light source and then place your transparent screen in front of it. Now, position the transparent screen so that it is close enough to the wall for the light from the object to shine through. Finally, draw or paint your desired image onto the walls.
Move or rotate your opaque object and/or transparent screen until your projection comes into focus and voila! You’re done!
Are there any free or low-cost alternatives for projecting an image onto a wall without a projector?
Yes, there are free or low-cost alternatives for projecting an image onto a wall without a projector. For example:-Sunlight can be used to project an image through a magnifying glass or mirror. This method is free and requires no additional equipment, but it does take some practice and patience to perfect the technique.-By using the light from a lamp, an image projected on the wall at night can be achieved.
Simply hold a floppy disk with the image of your choice over the light source and move the lamp closer or further away from the wall to change the size of the projection. This method is also cost-free and requires minimal effort.-Using an oil projector is another option for achieving a low-cost, DIY projection.
All that’s needed is a flashlight and an old 35mm slide film holder, available for less than $10 online. Cut out the slides with the desired images, place them in the project holder, and then shine them onto the wall with your flashlight!With these DIY solutions, you can easily achieve projections on a wall without a projector at little to no cost.